Showing posts with label tutorials. Show all posts
Showing posts with label tutorials. Show all posts

These paper lanterns, inspired by these at Moments of Mommyhood, are the perfect last-minute decoration, party favor, or kids craft. I put these four together this morning in about half an hour. In the spirit of treats not tricks, I've even put together a free printable of the faces for you. :)
What you need
- paper or cardstock -- white, black, green, and orange
- markers to draw your own faces or my printable faces
- scissors
- glue, tape, stapler

2. Cut the paper in strips, starting at the fold and stopping just before the edge of the paper.
3. Unfold the paper.
4. Create a tube by matching the short edges of the paper and staple (or otherwise connect) the ends.
Now you can attach a paper handle or other embellishments and enjoy!

Cut a brown paper handle, a couple of green leaves, and a couple thing green strips of paper. Curl the green strips of paper using your fingers (like curling ribbon) to make the vine tendrils. Attach the handle to the lantern and the leaves and tendrils to the handle.

Hair: Cut a strip of black paper that is zig-zaggy along one edge and straight along the other. (The strip needs to be as long as your paper is wide.) Glue to the green paper after printing/drawing the face, but before folding and cutting the paper.
Bolts: Cut two 1x2 inch strip of paper and roll them into tubes. Glue each tube closed and then glue them on opposite sides of Frankie's neck.

Wings: Print and cut the wing template (page 4 of the printable). Trace the wings on black paper and cut them out. Attach them to the back of a plain black bat body.
Eyes: Attach googly eyes (or paper eyes if your googly eyes are too small like mine were).

To make Casper most ghostly, cut the strips all the way to the bottom of the page (only the bottom) after unfolding the paper. Attach a handle and hang him in an appropriately spooky place... like the laundry room. :)
Happy (and safe) Haunting!
I"ll be haunting at these great parties:


Toptoberfest! It's the most wonderful time of the year!
In case you haven't heard, Toptoberfest is a fantastic celebration of handmade tops, hosted by Tricia of Leafy Treetop Spot. (You may recognize her from Housewife MacGyver.)
I am so pleased to be participating in Toptoberfest this year with Tricia -- if you're stopping by from Leafy Treetop Spot, welcome! Let's get right down to business and introduce...

Get the full tutorial > >
Read more from this post in Beauty follower »
In case you haven't heard, Toptoberfest is a fantastic celebration of handmade tops, hosted by Tricia of Leafy Treetop Spot. (You may recognize her from Housewife MacGyver.)
I am so pleased to be participating in Toptoberfest this year with Tricia -- if you're stopping by from Leafy Treetop Spot, welcome! Let's get right down to business and introduce...

The Dahlia Top is a reverse-applique design using two knit fabrics, both old tshirts in this case. That might sound (or look) complicated, but it's really more a matter of patience and time than talent. Trust me -- there's not a particular abundance of patience around my house (especially that's left over for crafts... I figure my children need my patience more than my other creations ;), but there is definitely more patience than artistic or sewing talent. :)
This top was inspired by this top on Etsy. I am a big fan of buying and supporting handmade, but I knew that I could put together a similar top in colors that I really loved for a tiny fraction of the cost. Of the three tops I've made, two of them were free, using only old tshirts that I wasn't wearing anymore. You can't beat free!
The tutorial and template are below -- and you can use the template for so much more than just a top! The same flower would look great on a skirt or a bag or anyplace else that you can think to put it, with any type of fabric -- or even paint! I've provided the template in several different sizes, or you can resize it to fit your projects needs.
I did it! I actually finished a craft in a set amount of time (plus a tutorial and a printable template!). In case you couldn't tell by the year-long diaper bag, that's not a strength of mine. :) But here he (she?) is: a welcome elephant.

She (he?) is my second entry (see the first here if you missed it) in the cardboard box round of the Iron Crafter over at Fireflies and Jellybeans. I decided to use cardboard along the lines of one of its first uses: as a replacement for wood. (Instead of building wooden crates to ship goods, US merchants started using cardboard boxes way back in 1895.) I love carved wood signs, but I lack the wood cutting tools and prowess. Until Debra and I have the means and geographic proximity to make our dreams of a shared crafting barn -- filled with tools and supplies and probably a limeade bar (my contribution) -- a reality, I will have to content myself with cutting cardboard instead.
My elephant-loving (yet otherwise completely normal) sister in Oregon just moved into a beautiful new (to them) house with plenty of room for her 4 children and 3 dogs, so I wanted to make her a nice housewarming gift. Hope you like it, Greta! If you are an elephant lover yourself or have one (otherwise normal or not) in your family, you can make your own elephant welcome sign.
Time spent:approximately 3 hours, plus paint/glue drying time
Money spent:$0! Everything on hand. Love that. :)
Finished dimensions: approximately 11W (including tail) x 12H (not including hanging ribbon)
What you'll need
What you'll do
First, read these notes:
Tips for cutting cardboard
Don’t think of cutting cardboard as cutting like you’d carve a piece of wood. Cardboard doesn’t cut that smoothly. The technique that works for me is more of a stabbing motion where the small cuts connect to make a (more or less) continuous cut. Henceforth this shall be called the stab-cut.
For finer details like the letters and the elephant’s tail, use a good sharp X-acto knife. Start with the inner parts of the letters (the hole in the O, for example). When you’ve cut the entire shape out, trim and even out the edges carefully with your paper-cutting scissors.
Be sure to have a firm surface underneath the cardboard you are cutting to help make clean, even cuts. This is especially important when cutting finer details. Another sheet of cardboard makes a firm enough surface to cut on without the worry of cutting into other firm surfaces, like kitchen tabletops. Not that there are any box-cutter scars on my tabletop. At least as far as my husband knows (shh!).
About dry-brushing
Dry-brushing is basically painting with a very dry brush (one with very little paint on it) to give a rough, scratchy look.
Preparing the elephant
Preparing the Welcome (or other words)
If you'd like to have an elephant with other words, you can download (free) the same font I used. The font is Lauren Script and it's available from DaFont here. If you'd like just the elephant, skip this section.
Assembling the sign
As you assemble the sign, you might want to look back at the original African elephant silhouette on fun-with-pictures.com for help with the positioning of the tusks and the head.
Also, since I'm sending my elephant off to rainy Oregon, I will be spraying him (her?) with a coat or two of a clear finish to help protect from the extra moisture in the air. We have very little moisture in this desert state of mine. :)
You may have noticed that I'm having trouble determining the gender of this elephant... It is a him? a her? any insight as to the gender of a cardboard creation? I think he or she needs a name, but I guess I'll leave that up to the recipient...


 I'm entering Round 5: Cardboard Boxes of the Iron Crafter at Fireflies and Jellybeans with my fantastic elephant friend. There's some pretty stiff competition over there! My favorites so far are the playhouse, stick horse, and treasure chest from a diaper box. I value my diapers above gold but I've never thought "treasure chest" when looking at a diaper box... Genius.
He (She?) is also a proud product of Stashbusting September.
And I'm linking up at these lovely parties:

Read more from this post in Beauty follower »

She (he?) is my second entry (see the first here if you missed it) in the cardboard box round of the Iron Crafter over at Fireflies and Jellybeans. I decided to use cardboard along the lines of one of its first uses: as a replacement for wood. (Instead of building wooden crates to ship goods, US merchants started using cardboard boxes way back in 1895.) I love carved wood signs, but I lack the wood cutting tools and prowess. Until Debra and I have the means and geographic proximity to make our dreams of a shared crafting barn -- filled with tools and supplies and probably a limeade bar (my contribution) -- a reality, I will have to content myself with cutting cardboard instead.
My elephant-loving (yet otherwise completely normal) sister in Oregon just moved into a beautiful new (to them) house with plenty of room for her 4 children and 3 dogs, so I wanted to make her a nice housewarming gift. Hope you like it, Greta! If you are an elephant lover yourself or have one (otherwise normal or not) in your family, you can make your own elephant welcome sign.
Time spent:approximately 3 hours, plus paint/glue drying time
Money spent:$0! Everything on hand. Love that. :)
Finished dimensions: approximately 11W (including tail) x 12H (not including hanging ribbon)
What you'll need
- Elephant and welcome templates (download below or here)
- Giving credit where credit is due: I did not draw the elephant myself. I used this African Elephant silhouette from fun-with-pictures.com to create the separate shapes for the head, body, and tusks.The file I have available for download is the separate shapes.
- Large-ish cardboard box, opened flat (mine was 24Lx9Dx13H, not including the top/bottom flaps)
- Box cutter
- X-acto knife
- Scissors
- ModPodge or other sturdy glue and glue stick
- Craft paint: light gray, dark gray, ivory, and the color you want Welcome (I used Apple Barrel's Country Grey, Pewter Grey, Satin Cream, and Sage Green)
- Paint brush (or two)
- Ribbon
- Several big, heavy books (I used phone books)
- A small strip (1/2 inch long) of clear plastic, like used in packaging (mine was from my son's first toothbrush! you know your mom is a crafter when...)
What you'll do
First, read these notes:
Tips for cutting cardboard
Don’t think of cutting cardboard as cutting like you’d carve a piece of wood. Cardboard doesn’t cut that smoothly. The technique that works for me is more of a stabbing motion where the small cuts connect to make a (more or less) continuous cut. Henceforth this shall be called the stab-cut.
- Start by stab-cutting a 1-2 inch section following your outline. Make sure that your box cutter blade is locked into position (safety!) and the blade is just longer than your cardboard is wide.
- Then move 1-2 inches one side or the other from that and stab-cut toward the section that you just cut.
- Rinse and repeat until you've stab-cut your whole outline.
- Once you’ve completed the outline of your shape, start gently punching it out. Watch the back and carefully re-cut any of the outer cardboard paper that wasn’t fully severed by your previous stab-cuts.
For finer details like the letters and the elephant’s tail, use a good sharp X-acto knife. Start with the inner parts of the letters (the hole in the O, for example). When you’ve cut the entire shape out, trim and even out the edges carefully with your paper-cutting scissors.
Be sure to have a firm surface underneath the cardboard you are cutting to help make clean, even cuts. This is especially important when cutting finer details. Another sheet of cardboard makes a firm enough surface to cut on without the worry of cutting into other firm surfaces, like kitchen tabletops. Not that there are any box-cutter scars on my tabletop. At least as far as my husband knows (shh!).
About dry-brushing
Dry-brushing is basically painting with a very dry brush (one with very little paint on it) to give a rough, scratchy look.
- Dip your brush (very stiff bristle or foam) in a tiny bit of paint.
- On a scrap piece of cardboard, dab until almost all of the paint is off the brush, so that you can see the texture of the brush when you dab. Too much paint will go on smoothly, and you want a rough texture, so err on the side of less, not more, paint.
- Gently dab and brush with round strokes to spread a very thin layer of the paint to give your elephant (or whatever else you're painting) a mottled, rough look.
Preparing the elephant
- Print the templates and cut out the elephant's head, body, and tusks.
- The elephant's body is just barely too large for a single piece of paper, so when you print that page, look for Page Scaling and select Tile large pages. My printer has an extra large bottom margin, so I scaled the image to 95% so that the elephant's body would print on two sheets instead of four.
- Trace two heads, two bodies, and one set of tusks on the non-printed side of your cardboard box.
- Using your box cutter and/or X-acto knife, start cutting out the traced pieces. If you've never cut cardboard before, you might want to check out my tips above if you didn't already.
- Keep cutting until you have two… three… four… five, six pieces: two heads (identical), two bodies (identical) and two tusks (one left and one right).
- Line up your identical head and body pieces and trim any rough or uneven edges so that they match perfectly. Almost perfectly is also acceptable. :)
- Spread a generous coat of ModPodge on one of the head pieces.
- Lay the other head piece on top of the glue and press them tightly together, making sure they are lined up properly. The cardboard will start to curl and warp with the moisture, so...
- Flatten on a hard surface underneath several large, heavy books (like phone books... or family history) until dry.
- Repeat the gluing and flattening for the elephant body pieces.
- Once the glue is dry, paint the double-thick head and body pieces with two coats of the lighter shade of gray paint and the tusks with two coats of ivory paint, allowing the paint to dry between coats
- Bonus Iron Crafter points for also using cardboard scrap for your paint palette ;)
- Also, I paint inside... on carpet... using one of the diaper changing pads that they give with the free diaper bags at my doctor's office. I was using it for a painting mat long before I had a baby! Works like a dream, then fold it up and stow it away.
- Dry-brush the head and body pieces with the darker shade of gray. See my note above about dry-brushing. Just in case you skipped it. ;)


Preparing the Welcome (or other words)
If you'd like to have an elephant with other words, you can download (free) the same font I used. The font is Lauren Script and it's available from DaFont here. If you'd like just the elephant, skip this section.
- Cut the printed Welcomes apart, leaving plenty of paper around the edges.
- Lightly glue (glue stick) both printed Welcomes to your cardboard
- In the file I provided, one Welcome is reversed. The letters require more cutting precision, and sometimes that's more achievable cutting from the back of the letters. So I gave you options. :) If you use it, you'll glue the reversed Welcome (the emocleW ;) ) on the printed side of your cardboard instead. Either way, be sure you have two Welcomes.
- Using the X-acto knife, cut out both Welcomes.
Be sure to read my tips above! Cardboard isn't really built for precision cutting, but some practice has helped me learn. :) - Glue the two Welcomes together with a good amount of ModPodge, inserting the small piece of plastic piece in between to two in order to to hold the W to the elcome.
- I originally included the plastic piece because I was going to hang the Welcome beneath the elephant. If you decide to glue it on top, like I did, the plastic is unnecessary but still nice to hold the word together.
- Flatten the double-thick Welcome beneath your thick books until dry.
- Paint the Welcome with two coats, allowing the paint to dry between coats.


Assembling the sign
As you assemble the sign, you might want to look back at the original African elephant silhouette on fun-with-pictures.com for help with the positioning of the tusks and the head.
- Glue tusks on elephant head, using a small amount of ModPodge, and let dry.
- With a more generous helping of ModPodge, glue elephant's head on his (her?) body. I chose to glue only the top portion of the head and let the warped curve of the trunk add some character and depth to the elephant.
- Flatten the head-body combo under your heavy books until dry.
- Glue the Welcome across the elephant's feet and let dry. (If the cardboard starts to warp again, press with books to flatten like before. Mine didn't on this step, though.)
OR glue 3-inch lengths of 1/4-inch ribbon to the back of the W, l, and e to hang the Welcome beneath elephant, as was my original vision. - Determine and mark your elephant's center of gravity so that she (he?) will hang straight once you've attached the ribbon. (I held the elephant at different points between two fingers to see where it would hang straight.)
- Spread a generous coat of ModPodge all around your center-of-gravity mark.
- Lay one end of a 24-ish-inch ribbon piece flat in the ModPodge on one side of the mark and the other end flat on the other side of the mark.
AND glue your Welcome ribbons to the back of the elephant if you've chosen to have a hanging welcome. - On top of your ribbon ends, spread another generous coat of ModPodge.
- Dry the ModPodge well.
- Display! Or, in my case, ship.


Also, since I'm sending my elephant off to rainy Oregon, I will be spraying him (her?) with a coat or two of a clear finish to help protect from the extra moisture in the air. We have very little moisture in this desert state of mine. :)
You may have noticed that I'm having trouble determining the gender of this elephant... It is a him? a her? any insight as to the gender of a cardboard creation? I think he or she needs a name, but I guess I'll leave that up to the recipient...
 I'm entering Round 5: Cardboard Boxes of the Iron Crafter at Fireflies and Jellybeans with my fantastic elephant friend. There's some pretty stiff competition over there! My favorites so far are the playhouse, stick horse, and treasure chest from a diaper box. I value my diapers above gold but I've never thought "treasure chest" when looking at a diaper box... Genius.
He (She?) is also a proud product of Stashbusting September.
And I'm linking up at these lovely parties:
Have you checked out The Iron Crafter competition over at Fireflies and Jellybeans? It's an awesome little competition. Fawnda picks a secret ingredient and then crafters vie to be crowned the Iron Crafter for their use of the secret ingredient (plus originality and appearance), just like on Iron Chef.
The secret ingredient this round is cardboard boxes. I have a submission in the works, but thinking about cardboard made me remember these little lovelies:

I made them last summer (maybe the summer before? I can't remember exactly and the date stamp on our old camera says every picture was taken in 2005) for my MIL.
My neighbor had some scrap wood that she had made this set of blocks from:
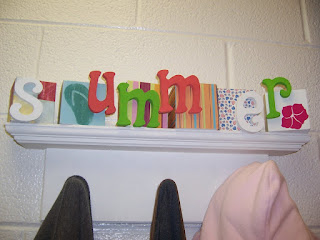
I had planned to cut the wood and make blocks like hers, but, my impatience got the better of me and I just started working with what I had: cardboard! I used the wood blocks as the base, but you could apply the same concept to a frame or even another chunk of cardboard if you don't have wood scraps available.
I made these back before I was doing the blog thing, so I didn't take pictures of the process, but I'll intersperse the construction info with pictures of the blocks so your eyes don't glaze over too much with all that text....
What you'll need
Update: I have confirmed that multiple entries are allowed! Woohoo! Iron Crafter here I come...
Read more from this post in Beauty follower »
The secret ingredient this round is cardboard boxes. I have a submission in the works, but thinking about cardboard made me remember these little lovelies:

I made them last summer (maybe the summer before? I can't remember exactly and the date stamp on our old camera says every picture was taken in 2005) for my MIL.
My neighbor had some scrap wood that she had made this set of blocks from:

I had planned to cut the wood and make blocks like hers, but, my impatience got the better of me and I just started working with what I had: cardboard! I used the wood blocks as the base, but you could apply the same concept to a frame or even another chunk of cardboard if you don't have wood scraps available.
I made these back before I was doing the blog thing, so I didn't take pictures of the process, but I'll intersperse the construction info with pictures of the blocks so your eyes don't glaze over too much with all that text....
What you'll need
- wood blocks (mine were 4x4s about 8 inches long)
- a corrugated cardboard box
- scrapbook paper
- craft paint
- staple gun
- box cutter or scissors
- glue stick
- a computer and printer
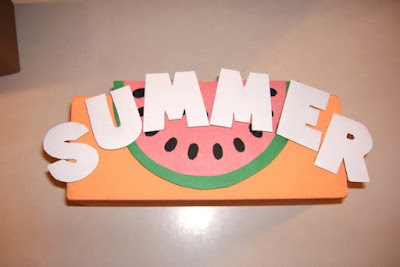 |
| summer... my favorite block of them all! |
- Sand each block and then paint them the colors you want. I used 2-3 coats of paint on each.
- On your computer, type the word(s) that you want on your block(s) in the font(s) and size that you want and print them on plain computer paper.
- You can save some ink by selecting the words and selecting Outline from the Font Effects in the Font pop-up window.
- Find clipart (or draw) any shapes that you want, such as the tulip, watermelon, leaf, and snowflake. Print them too.
- Paste your printed/drawn letters and shapes on your cardboard box.
- Using a box cutter, cut carefully around each of the letters and shapes to make a cardboard letter or shape.
- If you have shapes with multiple "pieces" like my watermelon and tulip, just cut out the main shape. You'll differentiate the pieces when you cut the scrapbook paper.
- Trace the letters and shapes on to your scrapbook paper and cut them out.
- Trace the letters/shapes face-down on the back of the paper and cut just outside that tracing line so you have some room for error and so that your paper will completely cover the cardboard.
- If you have shapes that are multiple colors, like my watermelon and tulip, cut those separate paper colors now.
- Staple the cardboard shapes and letters to the blocks (making sure that the paint has dried fully).
- If you are putting letters on top of shapes like I did with the watermelon, the leaf, and the snowflake, staple the shapes that will be underneath first and staple the letters after you have covered that shape with the paper (step 8)
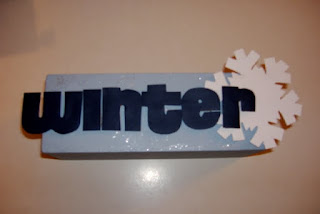
winter... the sparkliest block AND season - Glue the paper shapes and letters securely on top of the cardboard shapes.
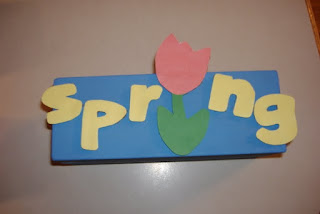 |
| spring... my almost-favorite season |
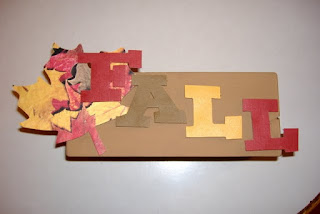 |
| fall... my favorite season, but my least favorite of the blocks |
So.... whaddya think? Iron Crafter worthy? I'm planning to enter the project that I have in the works right now, but maybe if I can submit two entries...
Update: I have confirmed that multiple entries are allowed! Woohoo! Iron Crafter here I come...

Happy Monday!

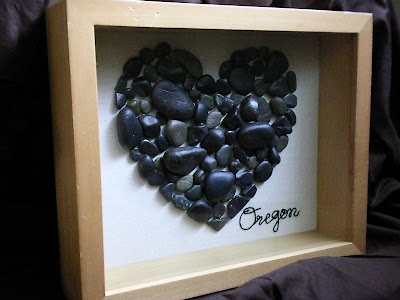
Of course, once the rocks were home and dry, they weren't that beautiful jet black anymore. Luckily, spraying the rocks with a clear varnish can very nearly duplicate the wet look. :)
Want to make your own rock souvenir? Or maybe you just want a better way to display
Time spent creating: 2.5 hours (not including waiting-to-dry time. or driving-to-the-beach time!)
Money spent: $8 for spray varnish and E6000 -- free if you already have those on hand!
What you'll need
- Rocks, all sizes, rinsed thoroughly
- E6000 industrial strength craft glue
- Crochet thread, like you would use for a doily
- Heavy laundry starch spray
- Matte ModPodge
- Matte clear spray finish (I used Krylon)
- Toothpicks (for fine-tuning)
- Foam paint brush
- Cookie sheet
- Spatula
- Newspaper
- Ironing board
- Steam iron
- Straight pins
- Scissors
Tutorial, the numbered real version
*This is how I did it... which is not usually necessarily the best or easiest way. I've included some "do as I say, not as I did" steps as well. :)
PART ONE: Creating the rock shape
- Draw or trace your desired collage shape on a piece of paper and cut it out.
- Make at least two copies. Trust me. :) (Step one and there's already something that I'm telling you to do that I didn't do...)
- Cover the cookie sheet with newspaper and place your paper shape on the newspaper.
- Arrange your rocks in the collage shape so that you'll know they fit. Think of it as a "green" jigsaw puzzle.
- Carefully transport rocks outside and spray with clear finish. I gave my rocks two thin coats to give them a nice wet-looking sheen.
- Keep the rocks laid out in your collage, if at all possible. That will make it so much easier to glue them in the same arrangement as you laid them out.
- While the rocks are drying, take the second copy of your shape and trace it very lightly in pencil onto your shadow box back piece (the one that goes right in the frame).
- If you plan to re-use the shadow box later, you'll want to find and cover another material to serve as the backing and to glue your rocks to. (That's another thing that I didn't think about until too late.)
- Once the rocks are completely dry, begin gluing them to your backing, one by one using E6000. Use a toothpick as needed for positioning.
- Very important! Be sure to erase the penciled line in sections just before you glue the rocks.


PART TWO: Creating the crochet thread word (inspired by MADE and peace love crafts) Please note than an extra measure of patience is required for this part of the creation process. :)
- Trace or write the word(s) you want to frame with your collage. I used a font from my computer because my cursive handwriting is not pretty at all.
- Carefully cut closely around the traced word(s) (which I did not do until later) and place your trimmed paper on your ironing board.
- If you don't want your ironing board cover drenched with starch, place a cloth underneath the paper.
- Pin the crochet thread to the paper and ironing board, following the shape of the letters.
- Place the first pin a quarter inch or so from the end of the thread, not right at the end. The tension as your form the other letters will pull it out and fray the end, and you'll have to start over. :(
- Another do as I say not as I did (at least not until later): Push the pins all the way down into the ironing board.

- Keep pinning. This will take awhile. :)
- For some sections, I used the pin as a post to wrap the thread around instead of putting the pin right through the thread.
- Use a toothpick as needed to get the thread in the right place.
- When you've pinned the entire word(s), douse (and I mean douse) the thread with laundry starch and allow it to penetrate the thread.
- If you get impatient at this point and start ironing before the starch has penetrated, you'll have flakes of starch on your painstakingly pinned thread-letters.
- Carefully remove the now-soaked paper in small chunks, using a toothpick.
- While you're allowing the starch to penetrate the thread, heat your iron to a high steam setting.
- Once the starch has had ample time to penetrate the thread, begin steam-setting the starch. Steam steam steam your painstakingly pinned thread and then gently iron the thread-letters.
- Repeat the dousing-waiting-ironing at least once more. I starched twice, but a third or fourth starching would be even better.
- Once you are happy with the starching and ironing, dry the pinned letters completely. Just leave them overnight or for the day while you go run errands.
- If you remove the pins while the starch is still wet, your letters might not hold their shape. Do you really want to have to redo all that pinning because of impatience? I didn't think so. :)
- When the letters are completely dry (and I mean completely dry), very carefully remove the pins.
- It's helpful to use a toothpick to lift up the head of the pin and/or hold the thread in place while you remove the pin.
- Apply a thin layer of ModPodge on your backing where you will place your thread-letters.
- Carefully transfer your letters to your backing. This is where my spatula came in handy.
- Arrange the letters exactly how you want them using a toothpick.
- Cover the letters with a thin layer of ModPodge.
- This is the time to pinch closed the little holes that the pins may have left in your thread. I just used two toothpicks. The ModPodge helps keep the holes closed.

- Apply 1-2 more thin layers of ModPodge, until you feel confident that the letters are firmly attached to the backing and will hold their shape.
- Allow the ModPodge to dry completely (an hour or so) and take a minute to admire your hard work.
- Place the backing in the frame.
- If you adhered the rocks and letters to a backing other than the original backing, this would be the point where you attach that backing to the original backing before placing it in the frame. :)


{update}
Lovely reader Swati commented: "I am a tad confused about all the extra work that went in making the letters. I should have thought that the simplest way would be to simply use fabric glue to glue the thread on the base. If you are using a different material (ie some other cloth so as to reuse the shadow box later), the word can be stuck before and then ironed as per instructions - and then the rocks go on. Is there any reason why that wouldn't work?"
My answer: No reason whatsoever! Especially if you are using a different material for the backing, fabric glue would be a much simpler method. It wouldn't have worked for me, unfortunately, because I do not usually think that far ahead. :) I didn't envision the letters until after the rocks were already glued. Also, I wanted to trace the letters (from a font that I loved) and I was using the original shadow box backing, which prevented me from tracing the letters like I wanted.
Most of all, I got the crazy idea and went for it without thinking about making it easy... If I had, I might have soaked the crochet thread in liquid starch (like these lanterns from Sallygoodin or The Project Corner or this bowl/nest by Stephanie Lynn from Under the Table and Dreaming) and then pinned it (or glued it, like Swati suggests). So many simpler methods to choose from. :) Thanks, Swati!
I'm joining


So flattered to be featured at


 Posts


