Showing posts with label guest posts. Show all posts
Showing posts with label guest posts. Show all posts

my list is online for your shopping convenience.
Want to put your list for Santa online? Or have a convenient online list to remember the awesome things you'd love to buy once you get your paycheck? That's
Note: Hehe, my day was so crazy yesterday I forgot to publish this... I've been busy making Halloween costumes and other fun things... Happy Thursday!


I'm sharing the tutorial today over at one of my favorite blogs, twelve crafts till christmas, and this morning I'm also teaching a group of women from church how to make them. It's a rock and roll earring fest! So click on over to twelve crafts for Stuff Your Stocking Saturday to learn how to make them, and enter to win one of these three pairs:

Yup, I've been AWOL for a few days. Nope, I'm not apologizing (remember, I don't do that sort of thing while blogging) -- just letting you know that my absence hasn't been because of anything terrible or life-changing. Just a trip to the post office. Oh, and a long weekend for The Mr which meant some quality time with the men in my life:
I've been slaving away on some tutorials for y'all, so those should appear here and there soon-ish. (I'm working on being non-committal... how do you think I'm doing? ;) I'm fighting the perpetual battle between the things I want to do (blog, craft, sleep) and the things I need to and should do (clean, play with my kid, sleep), and, on another front, the battle between crafting and blogging about crafting. Battles on two fronts are time consuming. :)
Oh, but I am over at Housewife Eclectic today talking about the post office, inspired by my recent trip. The internet can even help with mailing packages. I love me my internet.{contented sigh}
Happy Wednesday!
**edit -- the paragraph above makes it sound like I don't like playing with my kid... I do. Most definitely I do -- I just need to play with him more. He's a cutie -- I just asked him if I could see his teeth (he has *four* coming in right now to add to his current two) and he opened his mouth and said "ah." Love my kid. :)
Read more from this post in Beauty follower »
 |
A trip to the pumpkin patch (yes, that's a smile) one Mr. MacGyver and Walter, my vacuum. (Mr. Clean may or may not have made a guest appearance and been kicked out for looking shady.) |
I've been slaving away on some tutorials for y'all, so those should appear here and there soon-ish. (I'm working on being non-committal... how do you think I'm doing? ;) I'm fighting the perpetual battle between the things I want to do (blog, craft, sleep) and the things I need to and should do (clean, play with my kid, sleep), and, on another front, the battle between crafting and blogging about crafting. Battles on two fronts are time consuming. :)
Oh, but I am over at Housewife Eclectic today talking about the post office, inspired by my recent trip. The internet can even help with mailing packages. I love me my internet.{contented sigh}
Happy Wednesday!
**edit -- the paragraph above makes it sound like I don't like playing with my kid... I do. Most definitely I do -- I just need to play with him more. He's a cutie -- I just asked him if I could see his teeth (he has *four* coming in right now to add to his current two) and he opened his mouth and said "ah." Love my kid. :)

Since Little Miss Piña was born (two months ago tomorrow! eeek! where does the time go?), I've been sharing my favorite web-things as part of my regular posts over at Housewife Eclectic. In the postpartum haze, however, I've forgotten to tell you about them! So, in case you're not a follower over there (in which case you should be, because Debra is not only awesome, she's got a whole month of all-things-pumpkin going right now), you can pop over and read up on the things I love most about this wide web world:
And, as a thanks for reading, some gratuitous cute pictures:

Read more from this post in Beauty follower »
- dafont
- firegestures
- babycenter
- allrecipes
- w3schools
- pandora and grooveshark
- color scheme designer
- swagbucks
And, as a thanks for reading, some gratuitous cute pictures:
 |
| I'm sure you'll never think of chocolate frosting the same way again after having seen it dripping from my son's nose.... |

 |
| And this is about as close to a smile as we get on camera. : / |
 |
| Original image edited to add Picasa logo |
Just my regular little note to let you know that I'm questing (for a blog button) over at Housewife Eclectic again today, finishing up creating a blog button in Picasa. And, yes, questing is actually a word. I thought I was making it up! Apparently quest is also a verb. I certainly didn't know. My ignorance may be due to the fact that the English language is dead... or that I was up late making this little ensemble

because, that's right, my baby turns 1 today! Gah, where has the time gone?!? And, simultaneously, has it really only been a year? I'm vascillating between sentimental because "I just can't remember our family without him" and tired: "I could swear he's stressed at least 3 years off my life..."
Just a year ago, he was this little guy in a basket and now he's a not-so-little guy pulling all my fabric stash out of the same basket
 and consequently getting stuck half-way tipped over, unable to sit up and unwilling to just lie back. That's my sweet boy :)
Read more from this post in Beauty follower »

because, that's right, my baby turns 1 today! Gah, where has the time gone?!? And, simultaneously, has it really only been a year? I'm vascillating between sentimental because "I just can't remember our family without him" and tired: "I could swear he's stressed at least 3 years off my life..."
Just a year ago, he was this little guy in a basket and now he's a not-so-little guy pulling all my fabric stash out of the same basket

 Good morning! It's Wednesday (already?!?), so I'm over at Housewife Eclectic. Today we start a two-part series on creating a blog button for beginners. We'll be using Picasa, a free image program from Google, so everyone can join in! Come on over and join me for part one of The Quest for a Blog Button.
Remember my etsy wishlist for the CraftGossip giveway a bit ago? And remember how I told you that it was MY giveaway to win? And how I was letting the power of positive thinking work for me?
It worked! I won!
Told you so. ;)
I think my mail carrier must think that I have an online shopping addiction (which may or may not be true... when I have the budget for it...) because the packages have been pouring in. One day my little house-side mailbox was stuffed full: one mailing tube, one small package, and three big envelopes. I should have taken a picture but I was far too excited about opening the packages to document the moment. :)
The spoils of my positive thinking:
Plus these little red beauties that I've been wearing practically since the moment I opened the package:
And these fantastically wonderful charms that came later (since they shipped from Singapore!):
And, to make good things better, the people at CraftGossip have been awesome work with. There was a problem ordering one of the items on my list, so they let me choose another item, no muss, no fuss. (They have several other giveaways going on now, too, if you want to check them out on their giveaways page.)
I've always loved CraftGossip because they save me the work of following every creative blog in the blogosphere by, essentially, doing it for me. Now I just have more reasons to love them. :)
I'm not greedy, so I'll be sharing some of my spoils to spread the CraftGossip love. Stay tuned for that...
And, it's Wednesday, so I'm over at Housewife Eclectic today too. Come learn some of the background and basics of HTML. Nothing scary, I promise. :)
Read more from this post in Beauty follower »
It worked! I won!
Told you so. ;)
I think my mail carrier must think that I have an online shopping addiction (which may or may not be true... when I have the budget for it...) because the packages have been pouring in. One day my little house-side mailbox was stuffed full: one mailing tube, one small package, and three big envelopes. I should have taken a picture but I was far too excited about opening the packages to document the moment. :)
The spoils of my positive thinking:
 |
| peekaboo print from Papers Edge loves language flower print from HoneyTree set of 5 vintage earth-tones ties from Creative Kismet 1 yd mod apple oilcloth from Oilcloth Addict |
 |
| red coral earrings from Simply EC |
 |
| antique silver charms from Rock Chix Supplies |
 |
| This was my replacement item that should be here any day.... one yard of green apple oilcloth from Tadaa Studio. Reversible apple oilcloth high chair cover... check ;) |
I'm not greedy, so I'll be sharing some of my spoils to spread the CraftGossip love. Stay tuned for that...
And, it's Wednesday, so I'm over at Housewife Eclectic today too. Come learn some of the background and basics of HTML. Nothing scary, I promise. :)
 |
| image source |
Today I take the oath of a stashbuster:

You can read the full oath of Stashbusting September plus some FAQs (and join!) over at The T-Shirt Diaries. You'll want to join. All the cool kids are doing it. Plus, if just a few more cool kids join, Robin will add another prize to the kitty.
In other news... It's Wednesday! Pop by my weekly guest post at Housewife Eclectic to find a reason to celebrate today. And tomorrow. And next week. And next month. :)
Read more from this post in Beauty follower »
"Neither snow nor rain nor heat nor gloom of night stays this crafter
from the sworn diminishment of her appointed stash."
Craft for an entire month
with only the supplies
that you have on hand
{and in my head I add "or that you can beg, borrow, or steal-with-forgiveness/permission from your known crafting associates"}
You can read the full oath of Stashbusting September plus some FAQs (and join!) over at The T-Shirt Diaries. You'll want to join. All the cool kids are doing it. Plus, if just a few more cool kids join, Robin will add another prize to the kitty.
In other news... It's Wednesday! Pop by my weekly guest post at Housewife Eclectic to find a reason to celebrate today. And tomorrow. And next week. And next month. :)
In the online world, I've been over at Housewife Eclectic a bit... see a few of my favorite web-things here, here, and here.
In the real world, I've been snuggling these sweet cheeks

in between playing and rocking and reading with the best little boy in the whole world

and appreciating their fantastic daddy

and reminding myself that it's been not even three weeks while chanting the phrase "nine months to put it on, nine months to take it off..." :)
Thanks for reading! If naptime goes well (and long) tomorrow, I'll be back then to wrap up this month's Housewife MacGyver... if not, then I'll see you sometime! :)
Read more from this post in Beauty follower »
In the real world, I've been snuggling these sweet cheeks

in between playing and rocking and reading with the best little boy in the whole world

and appreciating their fantastic daddy

and reminding myself that it's been not even three weeks while chanting the phrase "nine months to put it on, nine months to take it off..." :)
Thanks for reading! If naptime goes well (and long) tomorrow, I'll be back then to wrap up this month's Housewife MacGyver... if not, then I'll see you sometime! :)

Happy Wednesday!

Happy Monday!

Of course, once the rocks were home and dry, they weren't that beautiful jet black anymore. Luckily, spraying the rocks with a clear varnish can very nearly duplicate the wet look. :)
Want to make your own rock souvenir? Or maybe you just want a better way to display
Time spent creating: 2.5 hours (not including waiting-to-dry time. or driving-to-the-beach time!)
Money spent: $8 for spray varnish and E6000 -- free if you already have those on hand!
What you'll need
- Rocks, all sizes, rinsed thoroughly
- E6000 industrial strength craft glue
- Crochet thread, like you would use for a doily
- Heavy laundry starch spray
- Matte ModPodge
- Matte clear spray finish (I used Krylon)
- Toothpicks (for fine-tuning)
- Foam paint brush
- Cookie sheet
- Spatula
- Newspaper
- Ironing board
- Steam iron
- Straight pins
- Scissors
Tutorial, the numbered real version
*This is how I did it... which is not usually necessarily the best or easiest way. I've included some "do as I say, not as I did" steps as well. :)
PART ONE: Creating the rock shape
- Draw or trace your desired collage shape on a piece of paper and cut it out.
- Make at least two copies. Trust me. :) (Step one and there's already something that I'm telling you to do that I didn't do...)
- Cover the cookie sheet with newspaper and place your paper shape on the newspaper.
- Arrange your rocks in the collage shape so that you'll know they fit. Think of it as a "green" jigsaw puzzle.
- Carefully transport rocks outside and spray with clear finish. I gave my rocks two thin coats to give them a nice wet-looking sheen.
- Keep the rocks laid out in your collage, if at all possible. That will make it so much easier to glue them in the same arrangement as you laid them out.
- While the rocks are drying, take the second copy of your shape and trace it very lightly in pencil onto your shadow box back piece (the one that goes right in the frame).
- If you plan to re-use the shadow box later, you'll want to find and cover another material to serve as the backing and to glue your rocks to. (That's another thing that I didn't think about until too late.)
- Once the rocks are completely dry, begin gluing them to your backing, one by one using E6000. Use a toothpick as needed for positioning.
- Very important! Be sure to erase the penciled line in sections just before you glue the rocks.


PART TWO: Creating the crochet thread word (inspired by MADE and peace love crafts) Please note than an extra measure of patience is required for this part of the creation process. :)
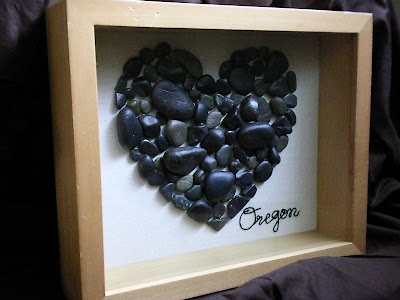
- Trace or write the word(s) you want to frame with your collage. I used a font from my computer because my cursive handwriting is not pretty at all.
- Carefully cut closely around the traced word(s) (which I did not do until later) and place your trimmed paper on your ironing board.
- If you don't want your ironing board cover drenched with starch, place a cloth underneath the paper.
- Pin the crochet thread to the paper and ironing board, following the shape of the letters.
- Place the first pin a quarter inch or so from the end of the thread, not right at the end. The tension as your form the other letters will pull it out and fray the end, and you'll have to start over. :(
- Another do as I say not as I did (at least not until later): Push the pins all the way down into the ironing board.

- Keep pinning. This will take awhile. :)
- For some sections, I used the pin as a post to wrap the thread around instead of putting the pin right through the thread.
- Use a toothpick as needed to get the thread in the right place.
- When you've pinned the entire word(s), douse (and I mean douse) the thread with laundry starch and allow it to penetrate the thread.
- If you get impatient at this point and start ironing before the starch has penetrated, you'll have flakes of starch on your painstakingly pinned thread-letters.
- Carefully remove the now-soaked paper in small chunks, using a toothpick.
- While you're allowing the starch to penetrate the thread, heat your iron to a high steam setting.
- Once the starch has had ample time to penetrate the thread, begin steam-setting the starch. Steam steam steam your painstakingly pinned thread and then gently iron the thread-letters.
- Repeat the dousing-waiting-ironing at least once more. I starched twice, but a third or fourth starching would be even better.
- Once you are happy with the starching and ironing, dry the pinned letters completely. Just leave them overnight or for the day while you go run errands.
- If you remove the pins while the starch is still wet, your letters might not hold their shape. Do you really want to have to redo all that pinning because of impatience? I didn't think so. :)
- When the letters are completely dry (and I mean completely dry), very carefully remove the pins.
- It's helpful to use a toothpick to lift up the head of the pin and/or hold the thread in place while you remove the pin.
- Apply a thin layer of ModPodge on your backing where you will place your thread-letters.
- Carefully transfer your letters to your backing. This is where my spatula came in handy.
- Arrange the letters exactly how you want them using a toothpick.
- Cover the letters with a thin layer of ModPodge.
- This is the time to pinch closed the little holes that the pins may have left in your thread. I just used two toothpicks. The ModPodge helps keep the holes closed.

- Apply 1-2 more thin layers of ModPodge, until you feel confident that the letters are firmly attached to the backing and will hold their shape.
- Allow the ModPodge to dry completely (an hour or so) and take a minute to admire your hard work.
- Place the backing in the frame.
- If you adhered the rocks and letters to a backing other than the original backing, this would be the point where you attach that backing to the original backing before placing it in the frame. :)


{update}
Lovely reader Swati commented: "I am a tad confused about all the extra work that went in making the letters. I should have thought that the simplest way would be to simply use fabric glue to glue the thread on the base. If you are using a different material (ie some other cloth so as to reuse the shadow box later), the word can be stuck before and then ironed as per instructions - and then the rocks go on. Is there any reason why that wouldn't work?"
My answer: No reason whatsoever! Especially if you are using a different material for the backing, fabric glue would be a much simpler method. It wouldn't have worked for me, unfortunately, because I do not usually think that far ahead. :) I didn't envision the letters until after the rocks were already glued. Also, I wanted to trace the letters (from a font that I loved) and I was using the original shadow box backing, which prevented me from tracing the letters like I wanted.
Most of all, I got the crazy idea and went for it without thinking about making it easy... If I had, I might have soaked the crochet thread in liquid starch (like these lanterns from Sallygoodin or The Project Corner or this bowl/nest by Stephanie Lynn from Under the Table and Dreaming) and then pinned it (or glued it, like Swati suggests). So many simpler methods to choose from. :) Thanks, Swati!
I'm joining


So flattered to be featured at


 |
| image source |
Also, remember my friend Elizabeth over at twelve crafts till christmas? (read my gush about her here) She has an awesome CSN giveaway going on right now to mark that it's only 4 more months until Christmas... yikes! Enter for your chance to win a $65 gift card. Woohoo!


 Posts


